Using a Shared KMM Library with JFrog Artifactory for an iOS Application
In my previous article, we used Kotlin Multiplatform Mobile (KMM) to build shared binary libraries: AAR and CocoaPods for Android and iOS respectively. In this article, I will show you how to deploy your private CocoaPods to JFrog Artifactory Cloud. We will then use the KMM library as a dependency for a local native iOS application that will resolve the dependency from Artifactory using CocoaPods.
Technology Stack
As of this article I am using the following:
- Xcode 14.2
- Swift 5
- CocoaPods 1.11.3
KMM Library
In this article, we will be deploying a KMM library in the form of CocoaPods into JFrog Artifactory. You can either build the code yourself by following along in the previous article or you can download the code for the KMM library which we will be using in this article to deploy to Artifactory:
git clone https://CodeGorilla@bitbucket.org/CodeGorilla/cg-lib-kmm-artifactory.git
JFrog Artifactory CocoaPods Repository
It is highly probable that you will have another team supporting your JFrog Artifactory, so I won't get too deep into Artifactory, but I do like to see what we will be using to better understand it. And you could also get a free trial, which I did, to play around with it.
Artifactory supports various types of repositories. In this article we are concerned with CocoaPods, so please have your Artifactory team create a new CocoaPods repository and provide you with the access and configuration information needed to deploy to it.
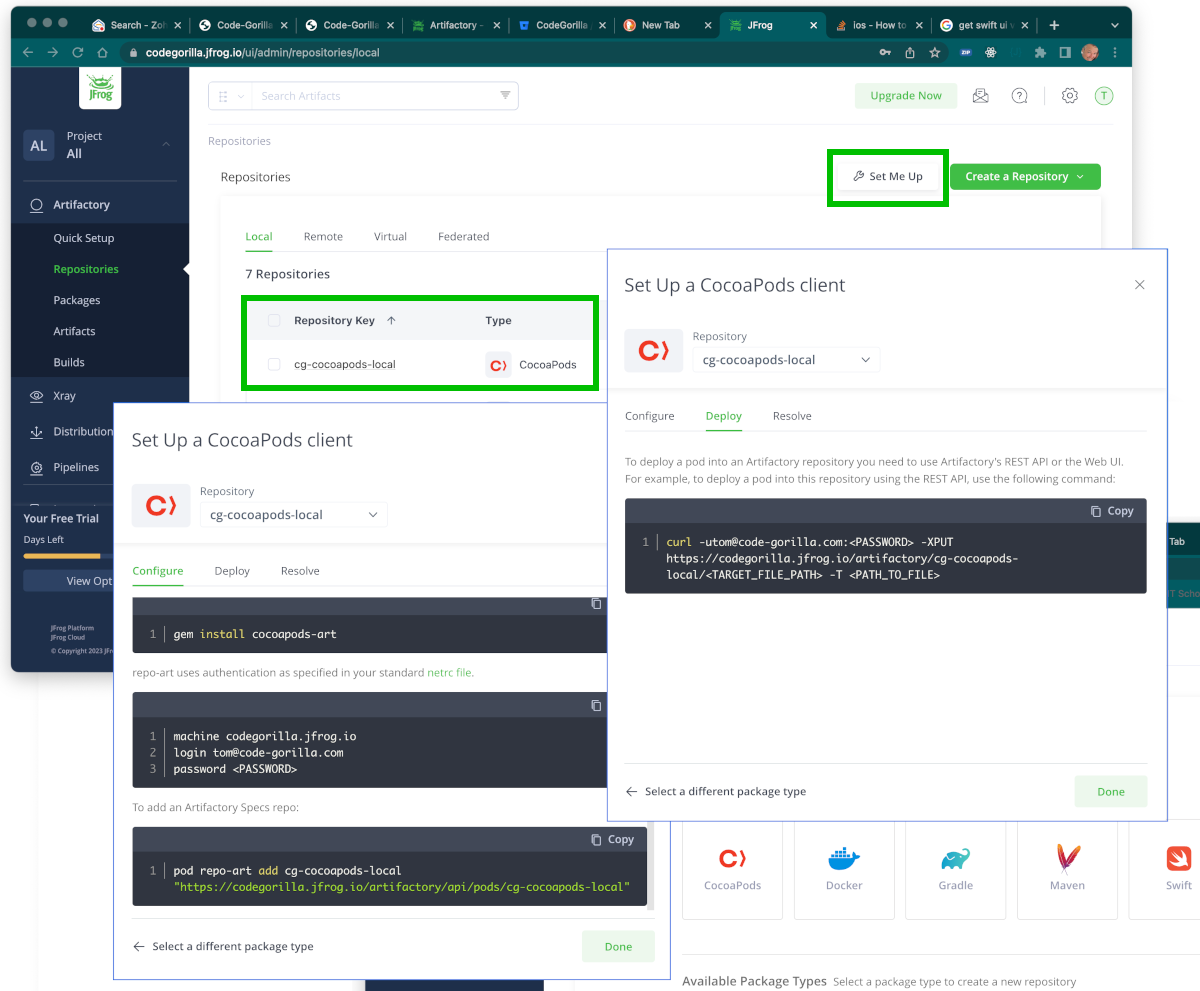
In this example, we have a CocoaPods repository named cg-cocoapods-local. The repository has a "Set Me Up" button that makes it easy to get started. There are 3 tabs: Configure, Deploy and Resolve which provide the information we will be using.
Configure Tab
On the configure tab, it provides the configuration requirements to use Artifactory with CocoaPods.
- To use Artifactory with CocoaPods, you must install cocoapods-art
- Authentication for repo-art is specified in your standard netrc file.
- You need to add the Artifactory Specs repo: pod repo-art add
If you're not setting up Artifactory yourself, you should have your Artifactory support team provide you with the configuration information and perform the instructions on your development machine. You may need to create the ~/.netrc file in your home directory with your credentials.
You can confirm that you are successful installed cocoapods-art and have added your Specs repo by running the following command:
pod repo-art list
Deploy Tab
The deployment tab has a single curl command that we will be using to deploy our pod via Artifactory's REST API:
curl -utom@code-gorilla.com:{PASSWORD} -XPUT https://codegorilla.jfrog.io/artifactory/cg-cocoapods-local/{TARGET_FILE_PATH} -T {PATH_TO_FILE}
Deployment
If you open the build.gradle.kts file in the library we are deploying, you will see the following relevant information for cocoapods:
cocoapods {

        summary = "KMM Library Artifact"

        homepage = "https://bitbucket.org/CodeGorilla/cg-lib-kmm-artifactory"

        version = "1.0.2"

        authors = "Tom Snyder, Code-Gorilla.com"

        license = "Apache-2.0"

        ios.deploymentTarget = "14.1"

        framework {

            baseName = "CodeGorillaArtifact"

        }

    }
Whenever you update the build.gradle.kts file and perform a gradle sync, it will push the updates from the cocoapods section into the CodeGorillaArtifact.podspec file. This is noteworthy, as you should update the version prior to any deployments into Artifactory.
In your terminal/command prompt window, execute the following gradle command:
gradle podPublishXCFramework
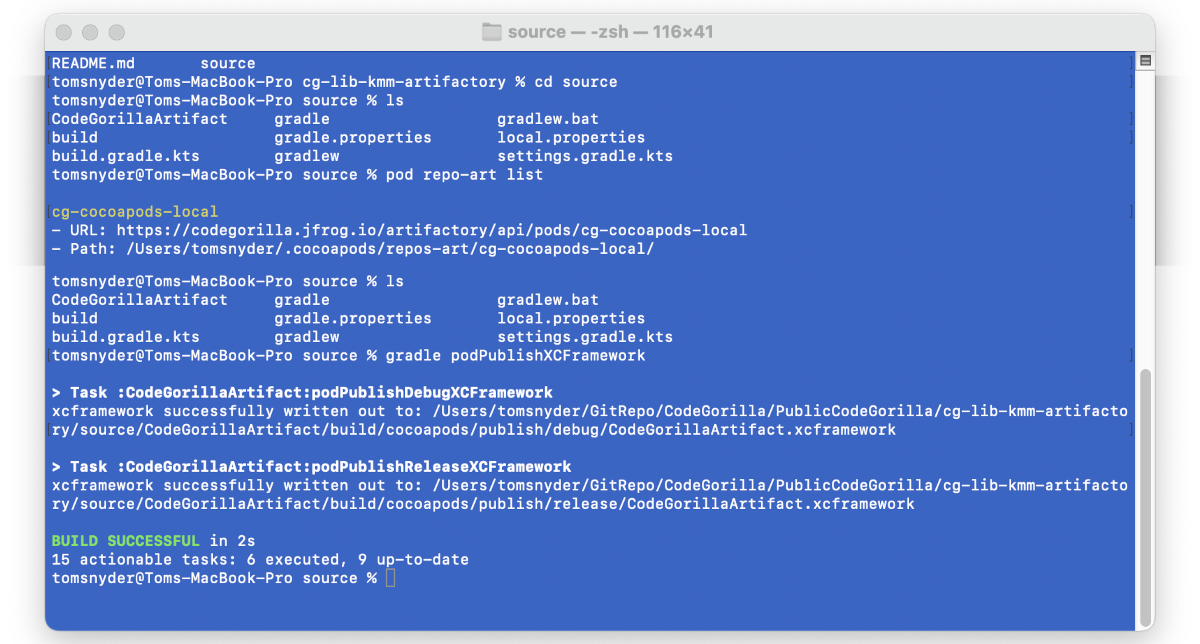
Upon successful completion, you should now see your CocoaPods files in the following location: /source/CodeGorillaArtifact/build/cocoapods/publish
Compress pod
Next, we will compress our pod to prepare for deployment. In your terminal/command prompt window, navigate to the cocoapods/publish folder and execute the following command:
tar -czvf CodeGorillaArtifact.tar.gz release/
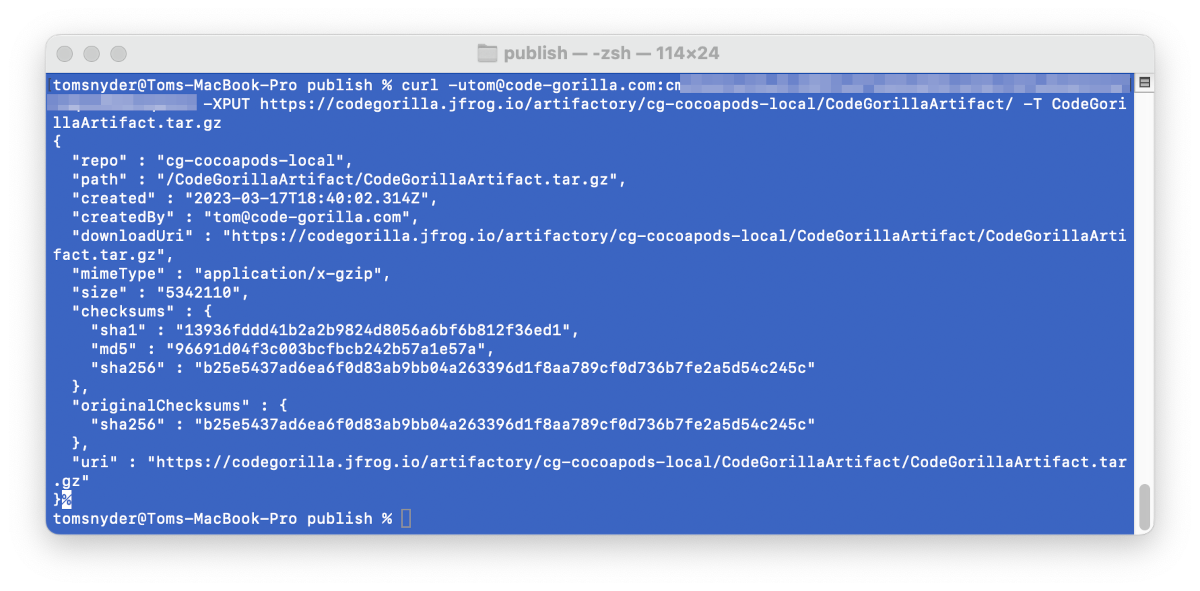
Deploy pod
To deploy the pod, we will use the instructions from Artifactory. In your terminal/command prompt window, at the location that you created your CodeGorillaArtifact.tar.gz file, execute the following (replacing {PASSWORD} with your password):
curl -utom@code-gorilla.com:{PASSWORD} -XPUT https://codegorilla.jfrog.io/artifactory/cg-cocoapods-local/CodeGorillaArtifact/ -T CodeGorillaArtifact.tar.gz
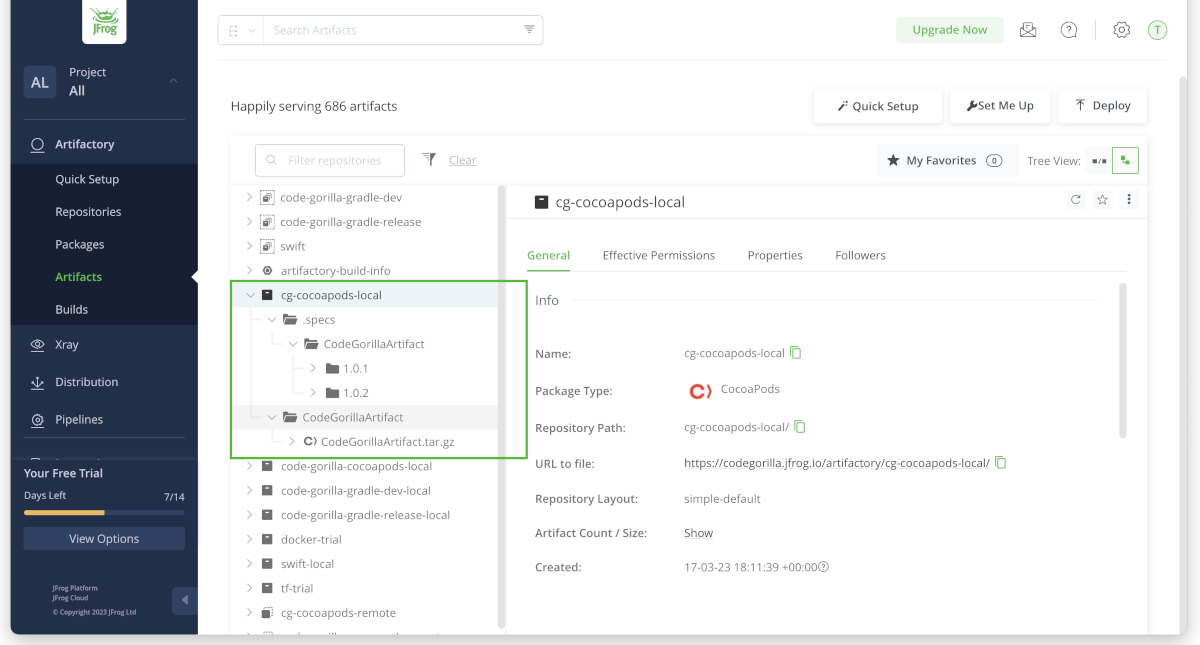
If you have access to Artifactory, you can see the newly deployed artifact in Artifactory:
Artifactory Client Repository Update
Once your pod has been deployed to the Artifactory repository, your development team can now update their client repository to get the latest version of the pod that you have deployed by executing the following:
pod repo-art update cg-cocoapods-local --verbose
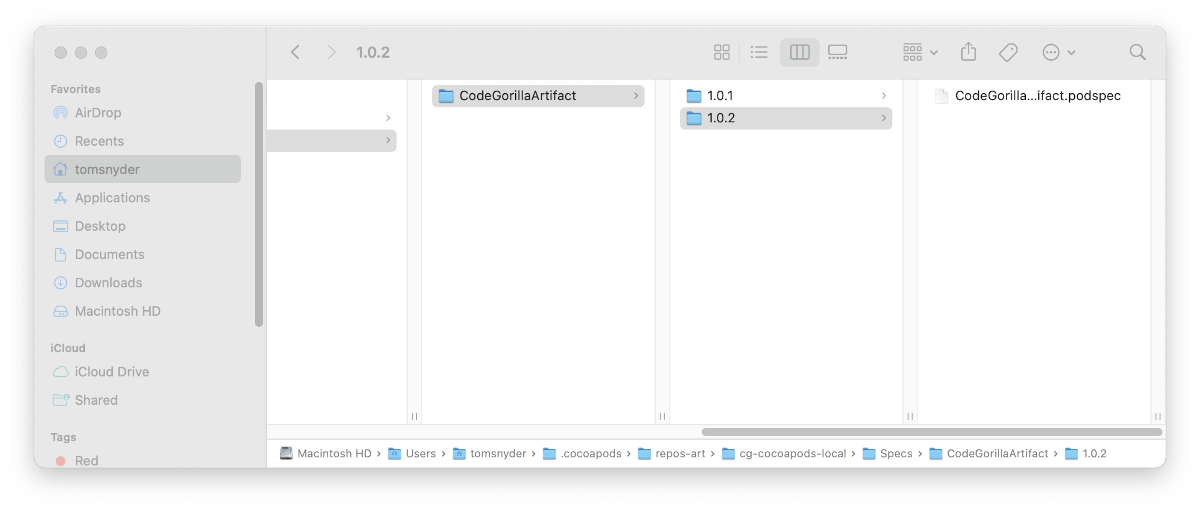
The development team can physically confirm they have the latest version by looking in the following directory:~/.cocoapods/repos-art/cg-cocoapods-local/Specs/CodeGorillaArtifact
Resolve Dependency
Now that our pod is in Artifactory, let's use it in a simple iOS application.
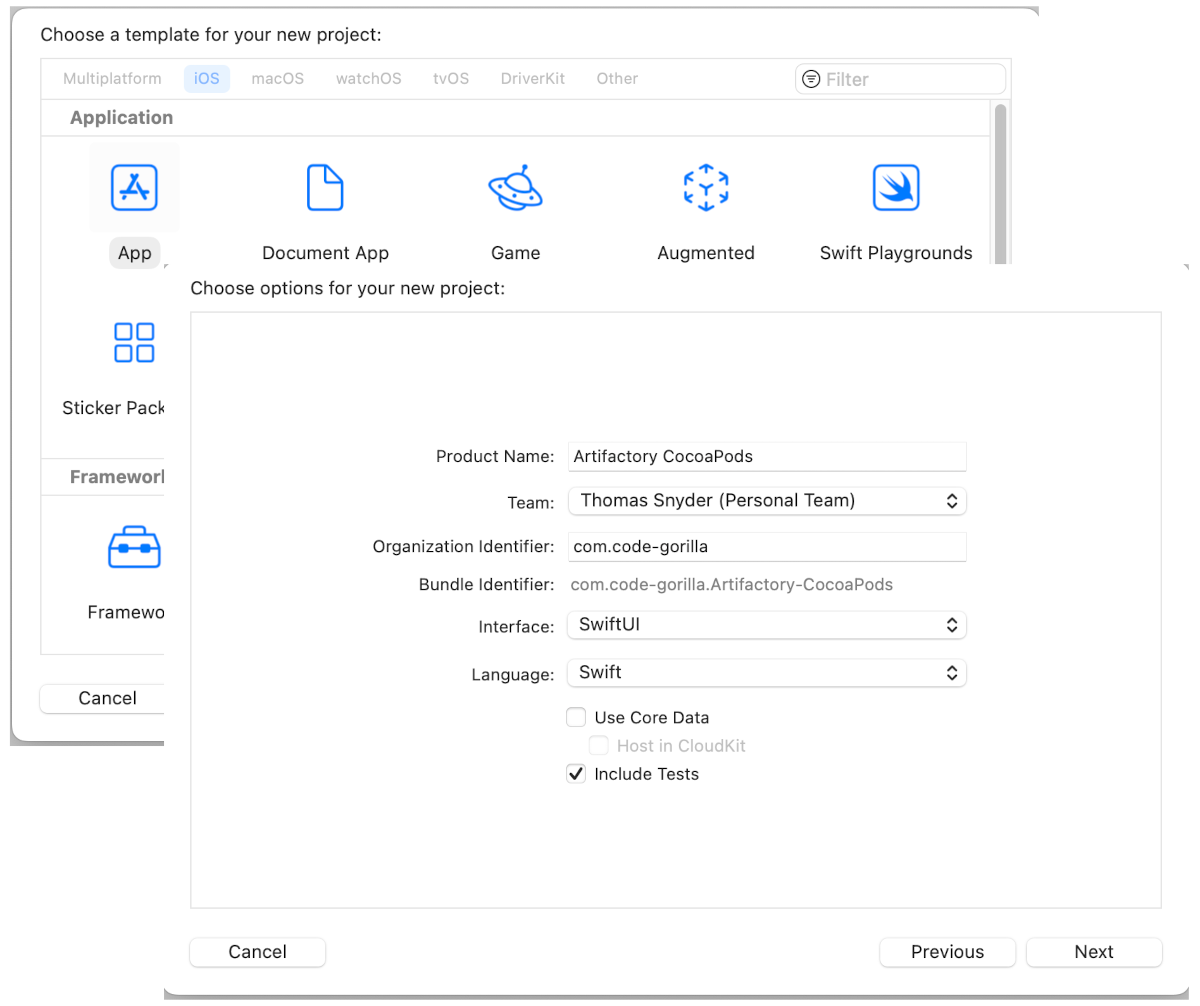
Create New iOS Application
Open Xcode and create a new project using an Empty Activity.
Now run the Hello World template code to ensure that your project is initialized properly.
Add CocoaPods to Application
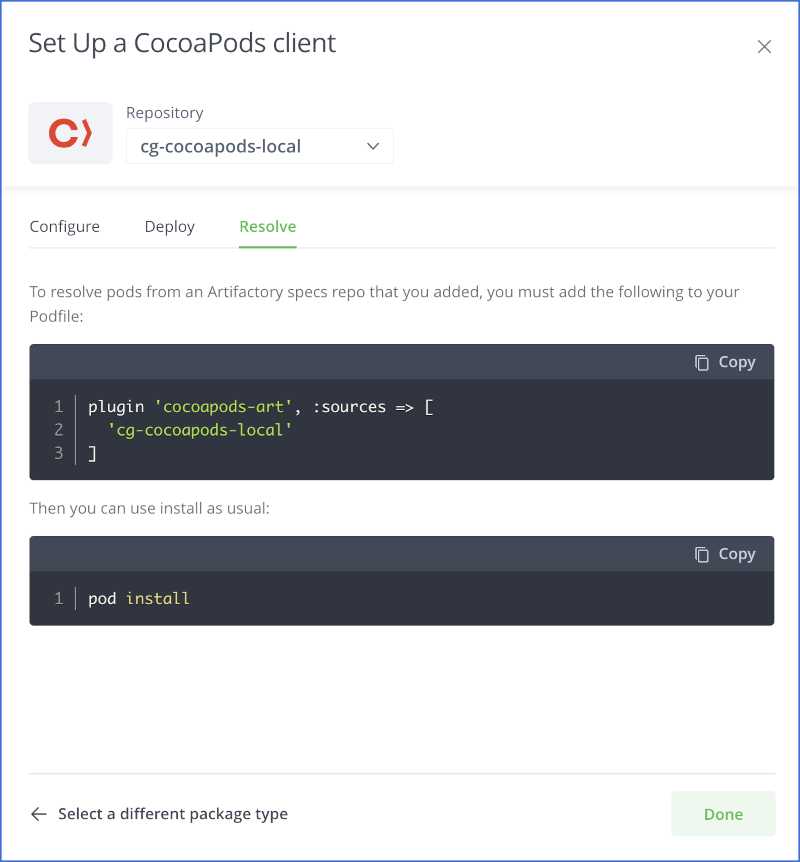
Now it's time to add CocoaPods to our iOS application. This is where we utilize the 3rd Resolve tab in the "Set Me Up" section in JFrog Artifactory.
Close Xcode and open your terminal/command prompt window and navigate to the source location of the iOS application that you just created; you should see your *.xcodeproj file for the project. Execute the following command:
pod init
Upon completion of the pod init you should now see a Podfile in your current directory. Edit that file in Xcode (make sure you use Xcode to avoid any formatting issues) as follows:
open -a Xcode Podfile
The command should open the Podfile. Add the following:
# Uncomment the next line to define a global platform for your project

# platform :ios, '9.0'


# Artifactory Plugin

plugin 'cocoapods-art', :sources => [

    'cg-cocoapods-local'

]


target 'Artifactory CocoaPods' do

  # Comment the next line if you don't want to use dynamic frameworks

  use_frameworks!


  # Pods for Artifactory CocoaPods

  pod 'CodeGorillaArtifact', '~> 1.0'


  target 'Artifactory CocoaPodsTests' do

    inherit! :search_paths

    # Pods for testing

  end


  target 'Artifactory CocoaPodsUITests' do

    # Pods for testing

  end


end
Save the PodFile and exit Xcode.
CocoaPod Install
Now that the PodFile is setup, we can install our pod into the workspace. Open your terminal/command prompt window and navigate to the source location of the iOS application that you just created. Execute the following command:
pod install

During the execution of the pod install command you should see CodeGorillaArtifact listed as installing. Upon completion, you should now see the new Artifactory CocoaPods.xcworkspace file was created.
CocoaPod Workspace
Now that you have added CocoaPods to your project, you should NO LONGER USE the *.xcodeproj file. You should ALWAYS USE the *.xcworkspace file for your project. Open the workspace as follows:
open -a Xcode Artifactory\ CocoaPods.xcworkspace
Using the Dependency in the Code
At this point, you're all set to begin using your dependency.
To stay focused on our objective, we will be making minimal updates to the template code to simply confirm that we have access to the XCFramework shared library that was created from KMM.
Edit the ContentView file to import our library and use it as follows:
import SwiftUI

import CodeGorillaArtifact


struct ContentView: View {

    let httpClient = GorillaHTTPClient()


    init() {

        // Temperature Converter

        let celsius = TemperatureConverter().fahrenheitToCelsius(fahrenheit: 0.00)

        let fahrenheit = TemperatureConverter().celsiusToFahrenheit(celsius: 0.00)

        let _ = print("KMM, Celsius: \(celsius)")

        let _ = print("KMM, Fahrenheit: \(fahrenheit)")


        // KTor HTTP Client

        httpClient.getClientInfo{ result, error in

            if let result = result {

                let _ = print("API Success: \(result)")

            } else if let error = error {

                let _ = print("API Failure: \(error)")

            }

        }

        }

    var body: some View {

        VStack {

            Image(systemName: "globe")

                .imageScale(.large)

                .foregroundColor(.accentColor)

            Text("Hello, world!")

        }

        .padding()

    }

}


struct ContentView_Previews: PreviewProvider {

    static var previews: some View {

        ContentView()

    }

}
Run your code and you should now see the Celsius and Fahrenheit results in the Debug Area. You will also see the results from the KTor HTTP Client.
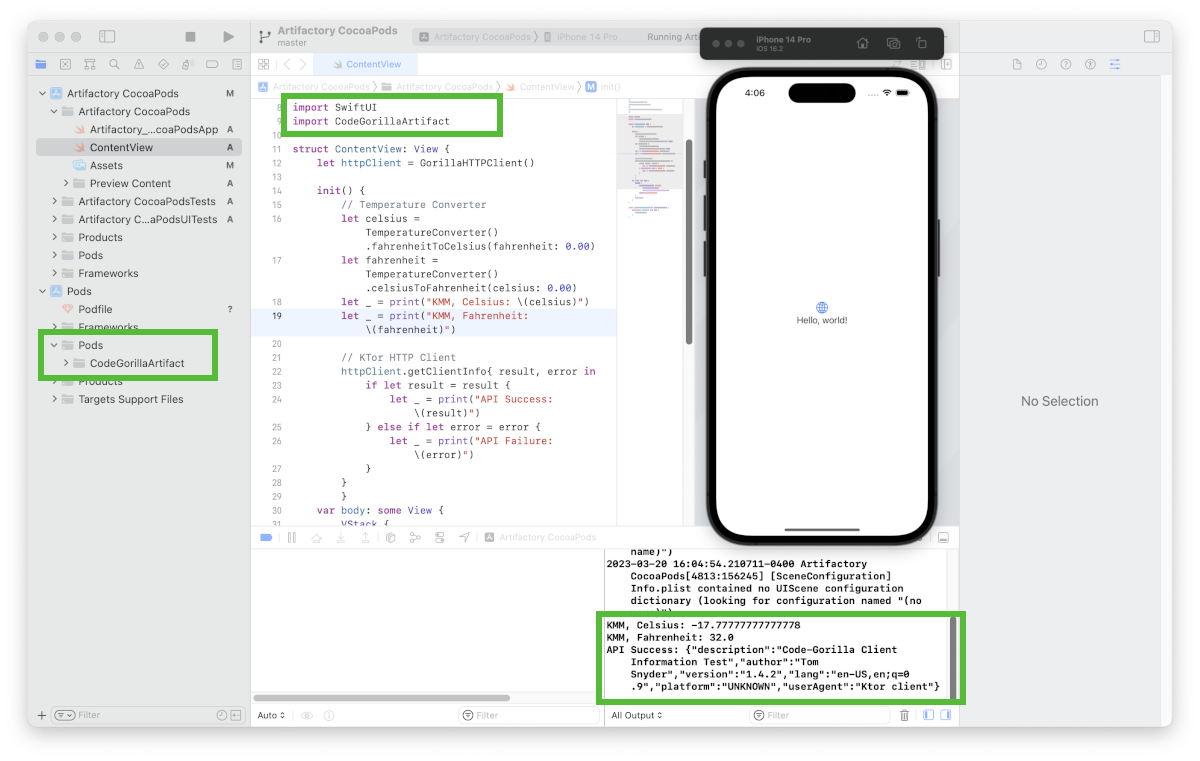
SUCCESS!!! At this point you have successfully built a Kotlin Multiplatform Mobile application that has common logic that can be used in both Android and iOS local native applications. This code is now deployed into Artifactory and has been used as a dependency in a local native iOS application!
Download the Code
You can also download the code for this article, with is a Swift UI application using the library:
git clone https://CodeGorilla@bitbucket.org/CodeGorilla/cg-app-using-kmm-artifactory-ios.git
References