Android JetPack Navigation and View Binding - No Binding Classes in java (generated)
There are plenty of articles out there that show just this, but there
is one main point that I couldn't find anywhere when I was trying to get View Binding to work, and that is that it didn't look like the binding classes were being created.
This article will cover that and also show the basic steps to prove it out.
Setup
Create a new project with an empty Activity.
- Select Java for language.
- Set API 21: Lollipop (or newer) as target
build.gradle (Project)
Make sure these are in your project level build.gradle:
dependencies {
        def nav_version = "2.3.2"
        classpath "androidx.navigation:navigation-safe-args-gradle-plugin:$nav_version"
    }

repositories {
        google()
    }
build.gradle (Module App)
apply plugin: "androidx.navigation.safeargs"

android {
buildFeatures {
        viewBinding true
    }
}

dependencies {
    def nav_version = "2.3.2"

    // Java language implementation
    implementation "androidx.navigation:navigation-fragment:$nav_version"
    implementation "androidx.navigation:navigation-ui:$nav_version"

    // Feature module Support
    implementation "androidx.navigation:navigation-dynamic-features-fragment:$nav_version"

    // Testing Navigation
    androidTestImplementation "androidx.navigation:navigation-testing:$nav_version"

    // Jetpack Compose Integration
    implementation "androidx.navigation:navigation-compose:1.0.0-alpha04"
}
JetPack Navigation
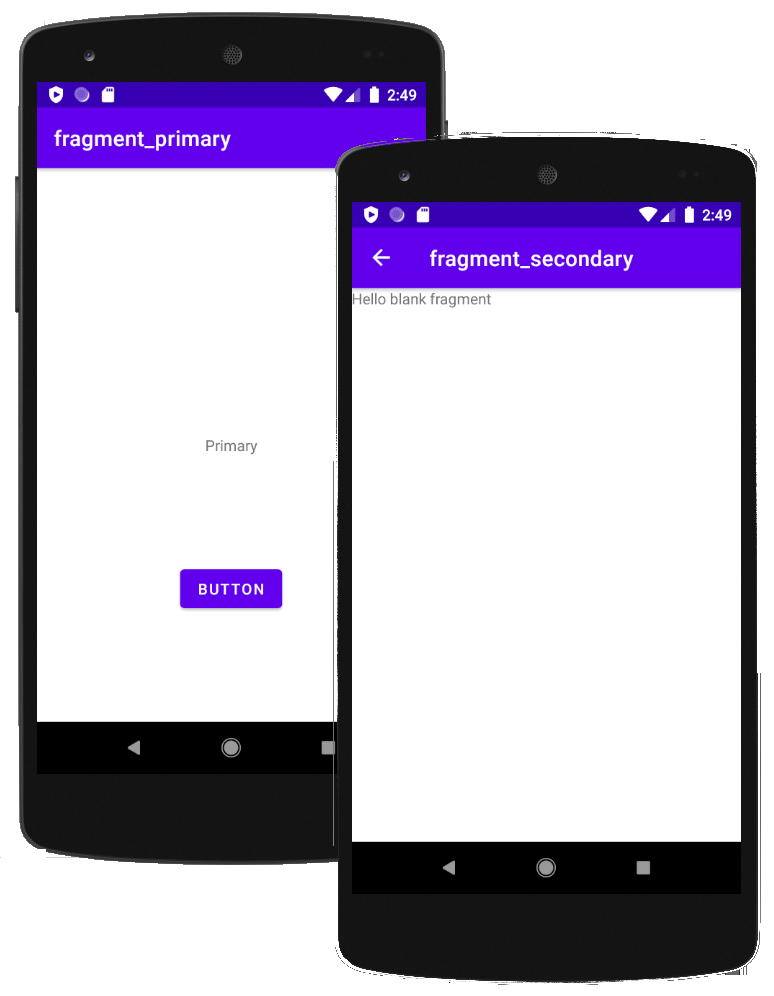
I am going to walk through the setup for a single activity that will swap out 2 fragments: Primary and Secondary.
The Primary fragment will be displayed on initial load that will have a button to show the Secondary fragment.
The secondary fragment will utilize the back feature of Navigation to get back to the Primary fragment.
This will be a short and sweet article, as it's basically a check list for myself with focus on the view binding.
Create Fragments
- Right Click on Projects | New | Fragment | Fragment (Blank)
- Rename BlankFragment to PrimaryFragment. Layout name will be fragment_primary.
Repeat for SecondaryFragment
Format Fragments to make the fragments look different to verify the navigation we will add a text view.
- Open res | layout | fragment_primary.xml
- Delete the default TextView
In component tree, right click on FrameLayout | Convert FrameLayout to Constraint Layout
- Drag a TextView onto the screen wherever you'd like and change the text to "Primary"
- Drag and drop a button anywhere on the screen.
- You don't need to do anything with the Secondary fragment.
Create a Navigation Graph
- Right click on res | New | Android Resource File
- File name: nav_graph, Resource Type: Navigation
- Leave it blank for now.
Add Navigation to Main Activity
- Open res | layout | activity_main.xml
- Delete the default TextView
- Add a NavHostFragment
- Select the nav_graph that you've previously created.
Setup Navigation Graph
- Open res | navigation | nav_graph.xml
- You should now see activity_main listed under hosts
- Click on the new Destination icon | add primaryFragment
- Click on the new Destination icon | add secondaryFragment
- Click on primaryFragment and drag connection circle onto secondaryFragment
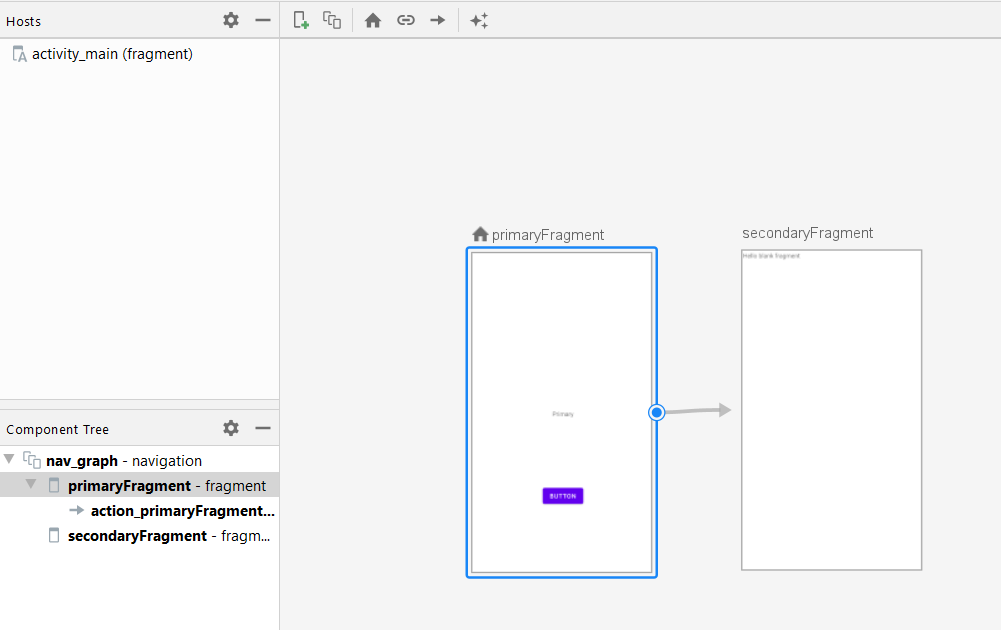
Now that the navigation graph is created and setup, rebuild the project to generate the PrimaryFragmentDirections object (Build | Rebuild Project).

You could build and run the application now to confirm no errors, but you'll just see the Primary fragment until we create a way to view the Secondary fragment, which is next.
JetPack View Binding
We will use view binding to access the button the Primary Fragment to add a click listener to display the Secondary fragment.
No Binding Classes in java (generated)
So here's the part that got me frustrated. I didn't see the Binding classes getting generated in the java (generated) folder!
No matter what I did they wouldn't display and I thought I was doing something wrong. Because I'm new to JetPack, the gurus are probably laughing, but the solution is that they are being generated, they are just not displayed in java (generated).
Sarcasm: and that makes sense because the Navigation Direction classes go there.
The binding files ARE being generated, but you won't see in java (generated), at least not at the time I wrote this article, but you can confirm their existance by looking in the build folder of the app.

In the build folder you will find a binding class for each layout file:
- ActivityMainBinding.java
- FragmentPrimaryBinding.java
- FragmentSecondaryBinding.java
When I was initially doing this, I didn't think the binding files were being generated. I tried several different methods and wasted a while on this. So here is the proof to show you that the binding files ARE actually being created and ready for usage.
Activate Button with View Binding and Navigation
OK! Now everything is prepared and confirmed as ready to go. Let's start coding!
Edit PrimaryFragment.java as follows:
public class PrimaryFragment extends Fragment {
    private FragmentPrimaryBinding binding;

    // TODO: Rename parameter arguments, choose names that match
    // the fragment initialization parameters, e.g. ARG_ITEM_NUMBER
    private static final String ARG_PARAM1 = "param1";
    private static final String ARG_PARAM2 = "param2";

    // TODO: Rename and change types of parameters
    private String mParam1;
    private String mParam2;

    public PrimaryFragment() {
        // Required empty public constructor
    }

    /**
     * Use this factory method to create a new instance of
     * this fragment using the provided parameters.
     *
     * @param param1 Parameter 1.
     * @param param2 Parameter 2.
     * @return A new instance of fragment PrimaryFragment.
     */
    // TODO: Rename and change types and number of parameters
    public static PrimaryFragment newInstance(String param1, String param2) {
        PrimaryFragment fragment = new PrimaryFragment();
        Bundle args = new Bundle();
        args.putString(ARG_PARAM1, param1);
        args.putString(ARG_PARAM2, param2);
        fragment.setArguments(args);
        return fragment;
    }

    @Override
    public void onCreate(Bundle savedInstanceState) {
        super.onCreate(savedInstanceState);
        if (getArguments() != null) {
            mParam1 = getArguments().getString(ARG_PARAM1);
            mParam2 = getArguments().getString(ARG_PARAM2);
        }
    }

    @Override
    public View onCreateView(LayoutInflater inflater, ViewGroup container,
                             Bundle savedInstanceState) {
        // Inflate the layout for this fragment
        // return inflater.inflate(R.layout.fragment_primary, container, false);
        binding = FragmentPrimaryBinding.inflate(inflater, container, false);
        View view = binding.getRoot();
        return view;
    }

    @Override
    public void onViewCreated(@NonNull View view, @Nullable Bundle savedInstanceState) {
        super.onViewCreated(view, savedInstanceState);
        binding.button2.setOnClickListener(view1 -> onPrimaryClick(view1));
    }

    void onPrimaryClick(View view) {
        System.out.println("Button Clicked.");
        NavDirections action = PrimaryFragmentDirections.actionPrimaryFragmentToSecondaryFragment();
        Navigation.findNavController(view).navigate(action);
    }
}
Navigate Up
At this point we can get to the Secondary fragment and we could get back with the back button. Now let's also also add a navigate up button to get back to the Primary screen.
Edit the MainActivity.java and add the following:
public class MainActivity extends AppCompatActivity {

    private NavController navController;

    @Override
    protected void onCreate(Bundle savedInstanceState) {
        super.onCreate(savedInstanceState);

        setContentView(R.layout.activity_main);

        navController = Navigation.findNavController(this, R.id.fragment);
        NavigationUI.setupActionBarWithNavController(this, navController);
    }

    @Override
    public boolean onSupportNavigateUp() {
        return NavigationUI.navigateUp(navController, (DrawerLayout) null);
    }
}
Notes:
- You may see a lot of references to Butterknife, which was a great view binding option before JetPack's View Binding.
- When looking for view binding information you will probably get misdirected to data binding as they seem to get mixed together. Be aware that you may be looking at the wrong information. View binding and Data binding are different.
References